Vinyl Cutting
Vinyl cutter how-to and setup guides.
- What are the vinyl cutters?
- How do I book a vinyl cutter?
- What materials can I use with the vinyl cutters?
- How much does it cost? and how can I pay?
- File Preparation in Adobe Illustrator for Vinyl cutting
- Preparing to cut on Silhouette vinyl cutter software
- Video Guides - Printer setup & Transfer process
What are the vinyl cutters?
The vinyl cutters can be used to cut designs from self adhesive vinyl that can be transferred to a desired surface. This can include exhibition spaces, book covers, display cases, garments such as t shirts / tote bags and other unique objects. Using a 2D vector file a rotary blade will cut out a design without releasing the backing liner; this allows you to transfer all elements of your design in one go.

Next Page: How do I book a vinyl cutter?
Return to: Vinyl cutter Information
How do I book a vinyl cutter?
Vinyl cutting times can be booked via the ORB.
-
To book a collection time visit ORB on your laptop or desktop and select Find Rooms and Spaces.
-
Students will be asked to complete an online quiz the first time they book the vinyl cutter on the ORB.
-
Please book a morning or afternoon slot to use the vinyl cutter.
-
It is essential you arrive promptly so there is enough time for you to complete your job. Please bring your files with you on a USB to the appointment. We are currently only accepting .ai illustrator files that have been exported into .dxf format.
-
Artboards and/or files should be labelled with the corresponding material/colours to be vinyl cut.
-
Payment will need to be made via the Estore. After the job finishes a technician will inform you of your total cost depending on amount of material used.
-
For any queries or specialist support please email 3dworkshop.lcc@arts.ac.uk before you book
Next Page: What materials can I use with the vinyl cutters?
Return to: Vinyl cutter Information
What materials can I use with the vinyl cutters?
The 3D workshop keeps a stock of the most popular colours with a matte finish in rolls of 310mm wide.
This includes but not limited to:
- Black
- White
- Red
- Yellow
- Purple
- Green
- Blue
- Orange
- Pink
- Grey
Depending on stock levels, we often also have some glossy colours, transparent vinyl, and chrome vinyl in silver or gold.
To enquire about available colours please email 3dworkshop.lcc@arts.ac.uk before you book
Specialist vinyl or large quantities of vinyl will need to be purchased externally. Our main supplier for vinyl is MDP Supplies
Next Page: How much does it cost? and how can I pay?
Return to: Vinyl cutter Information
How much does it cost? and how can I pay?
The vinyl cutters are charged at £2 per metre and payment process can be found in the digital fabrication section of the eStore.
You will recieve an email detailing the amount you need to pay upon completion of your job. Please bring a copy of your receipt with you when collecting your work as proof of payment.
Next Page: File Preparation in Adobe Illustrator for Vinyl cutting
Return to: Vinyl cutter Information
File Preparation in Adobe Illustrator for Vinyl cutting
Illustrator file set up
- Open Illustrator and create a new document with RGB colour profile and millimeter units. Create an art board that is the same size as the object you will transfer the vinyl on to (e.g. an A4 book - A4 artboard).

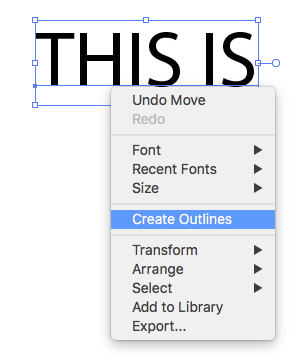
- Select all type in your document, right click and “create outlines” this will expand the type into an object. Type should be no smaller than 18pt (this is a general standard and may need to be adjusted/tested depending on font style)

- Draw a registration box that is the same size as the object you will be applying the vinyl too (in the example this is an A4 document). This will aid in registration during vinyl transfer keeping all elements in the correct position.

- All content must be set to black stroke and 0.1pt for vinyl cutting


- To export go to File in the top menu > Export > Save as a AutoCAD Interchange File (dxf)

- Select AutoCAD Version R13/LT95 from the pop up export window

The DXF will by default save in the same location as the .ai file. This DXF file is now ready to be programmed in Silhouette Cameo
Next Page: Preparing to cut on Silhouette vinyl cutter software
Return to: Vinyl cutter Information
Preparing to cut on Silhouette vinyl cutter software
- Open your .DXF and group all the elements with CMD+G to retain their position and move into an appropriate location, this should not be too close to the edge.


Next Page: Video Guides - Printer setup & Transfer process
Return to: Vinyl cutter Information
Video Guides - Printer setup & Transfer process
Printer setup
Transfer application process